Unit: Pen & Ink – Over the next two weeks we review the four techniques to create texture using pen and ink media. Specifically, we will discuss the importance of making underdrawings to establish value differences and discuss different ways to create smooth transitions between values. We will have several opportunities to practice and improve our techniques. We will create a "Lost Design" art piece to focus on creating smooth transitions using the different textures while working in our practice booklets. Practice time is crucial for the development of drawing skills and must take place, both in and out of the classroom. We will end the unit by creating a final piece of artwork by choosing our subject matter and finishing the work using pen and ink to demonstrate the knowledge and skilled we have gained.
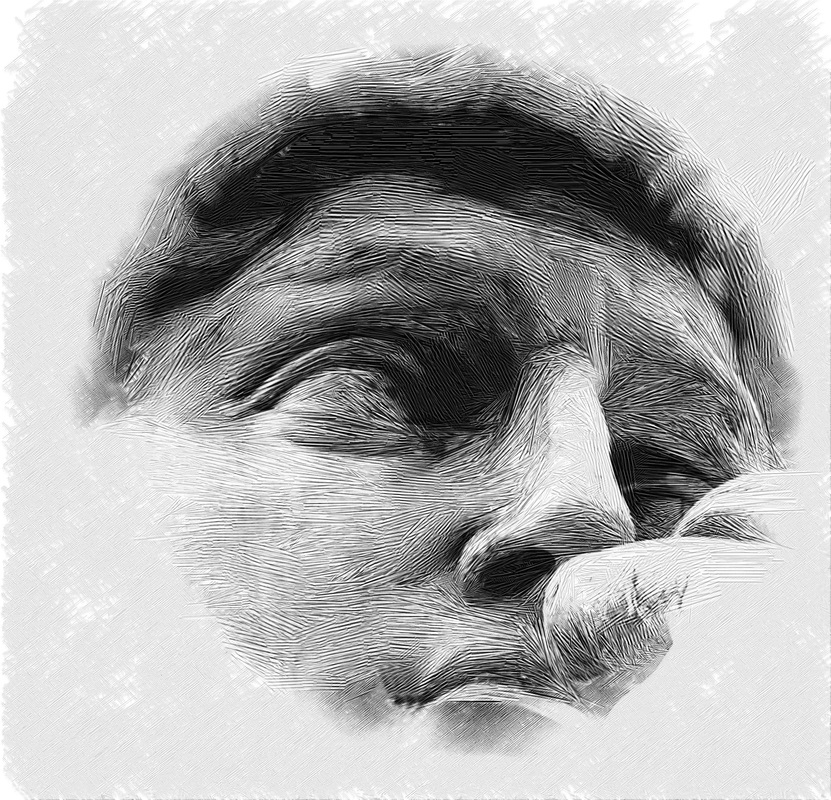
http://www.gertrudisgraphics.com/img/PenAndInkFiles/Michelangelo-David-pen-and-ink-500dpi.jpg
|
Pen and Ink Drawings: In fine art, the term 'pen and ink' denotes a drawing technique involving the use of black and other colored inks which are applied to a support (generally paper) with either a dip pen or a reservoir pen. This traditional, versatile media has been used by Western artists since ancient-Egyptian times, for sketches, finished drawings or ink and wash paintings. It is also one of the main mediums involved in book illustration (see, for instance, Aubrey Beardsley) and in Surrealist automatic drawing (for details, see: Automatism in Art).
Early History: Artists from several ancient cultures used ink in their fine art drawings. One of the earliest surviving images in Greek art, drawn in pen and dye (on papyrus), is The Abduction of Briseis (c.300 CE) by an unknown Greek artist (Bayerische Staatsbibliothek, Munich). Information from: http://www.visual-arts-cork.com/drawing/pen-and-ink-drawings.htm |
Overview: In-class work- "Lost Design Assignment" and Final: Pen & Ink Art piece
Materials: Drawing paper for homework and practice, Multimedia paper for Lost Design project. Pencil for underdrawings, eraser, Permanent Ink pens or gel pens. NO ball point pens. Bristol paper for Final Artwork.
- Discuss and choose a picture or object to use as a reference for your final P & I project.
- Check in printed images for trimester projects.
- Check in homework
- Make value scales of each of the four textures using Pen & Ink.
- Do an underdrawing of a piece of fruit., then trace another one for later.
- Using Pen & Ink lay in the different values and textures you see.
- Draw two more objects of your choice from home. Begin with an under-drawing, make sure your objects are three-dimensional. Use any texture that will produce best representation of the surface.
Materials: Drawing paper for homework and practice, Multimedia paper for Lost Design project. Pencil for underdrawings, eraser, Permanent Ink pens or gel pens. NO ball point pens. Bristol paper for Final Artwork.
Lost Design Examples
Student examples of final Pen and Ink.
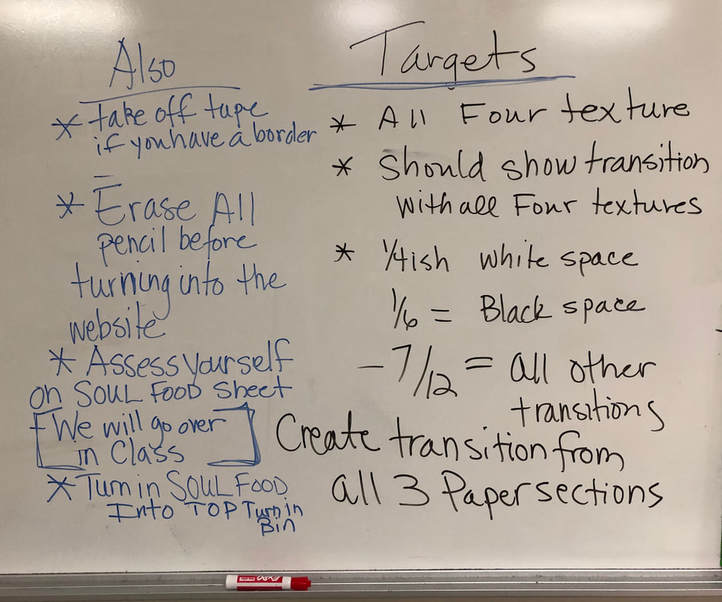
Process for final Pen and Ink:
- Set up your borders.
- Start your artwork with proper borders. then, lightly create underdrawings to guide the proportions and values within and around the form.
- With Pen and Ink, begin laying down proper value and texture that displays the surface area or your object making your artwork three-dimensional.
- Assess your work and add more value where it is needed to define and clarify your work.
- Erase any underdrawings.
- Turn in your artwork on line.
- Finish peer assessment and self assess learning targets on S.O.U.L. Food sheet and turn to the Turn-in Bin.
